flowdrone build guide (in-progress)
autonomous quadrotor control via PX4
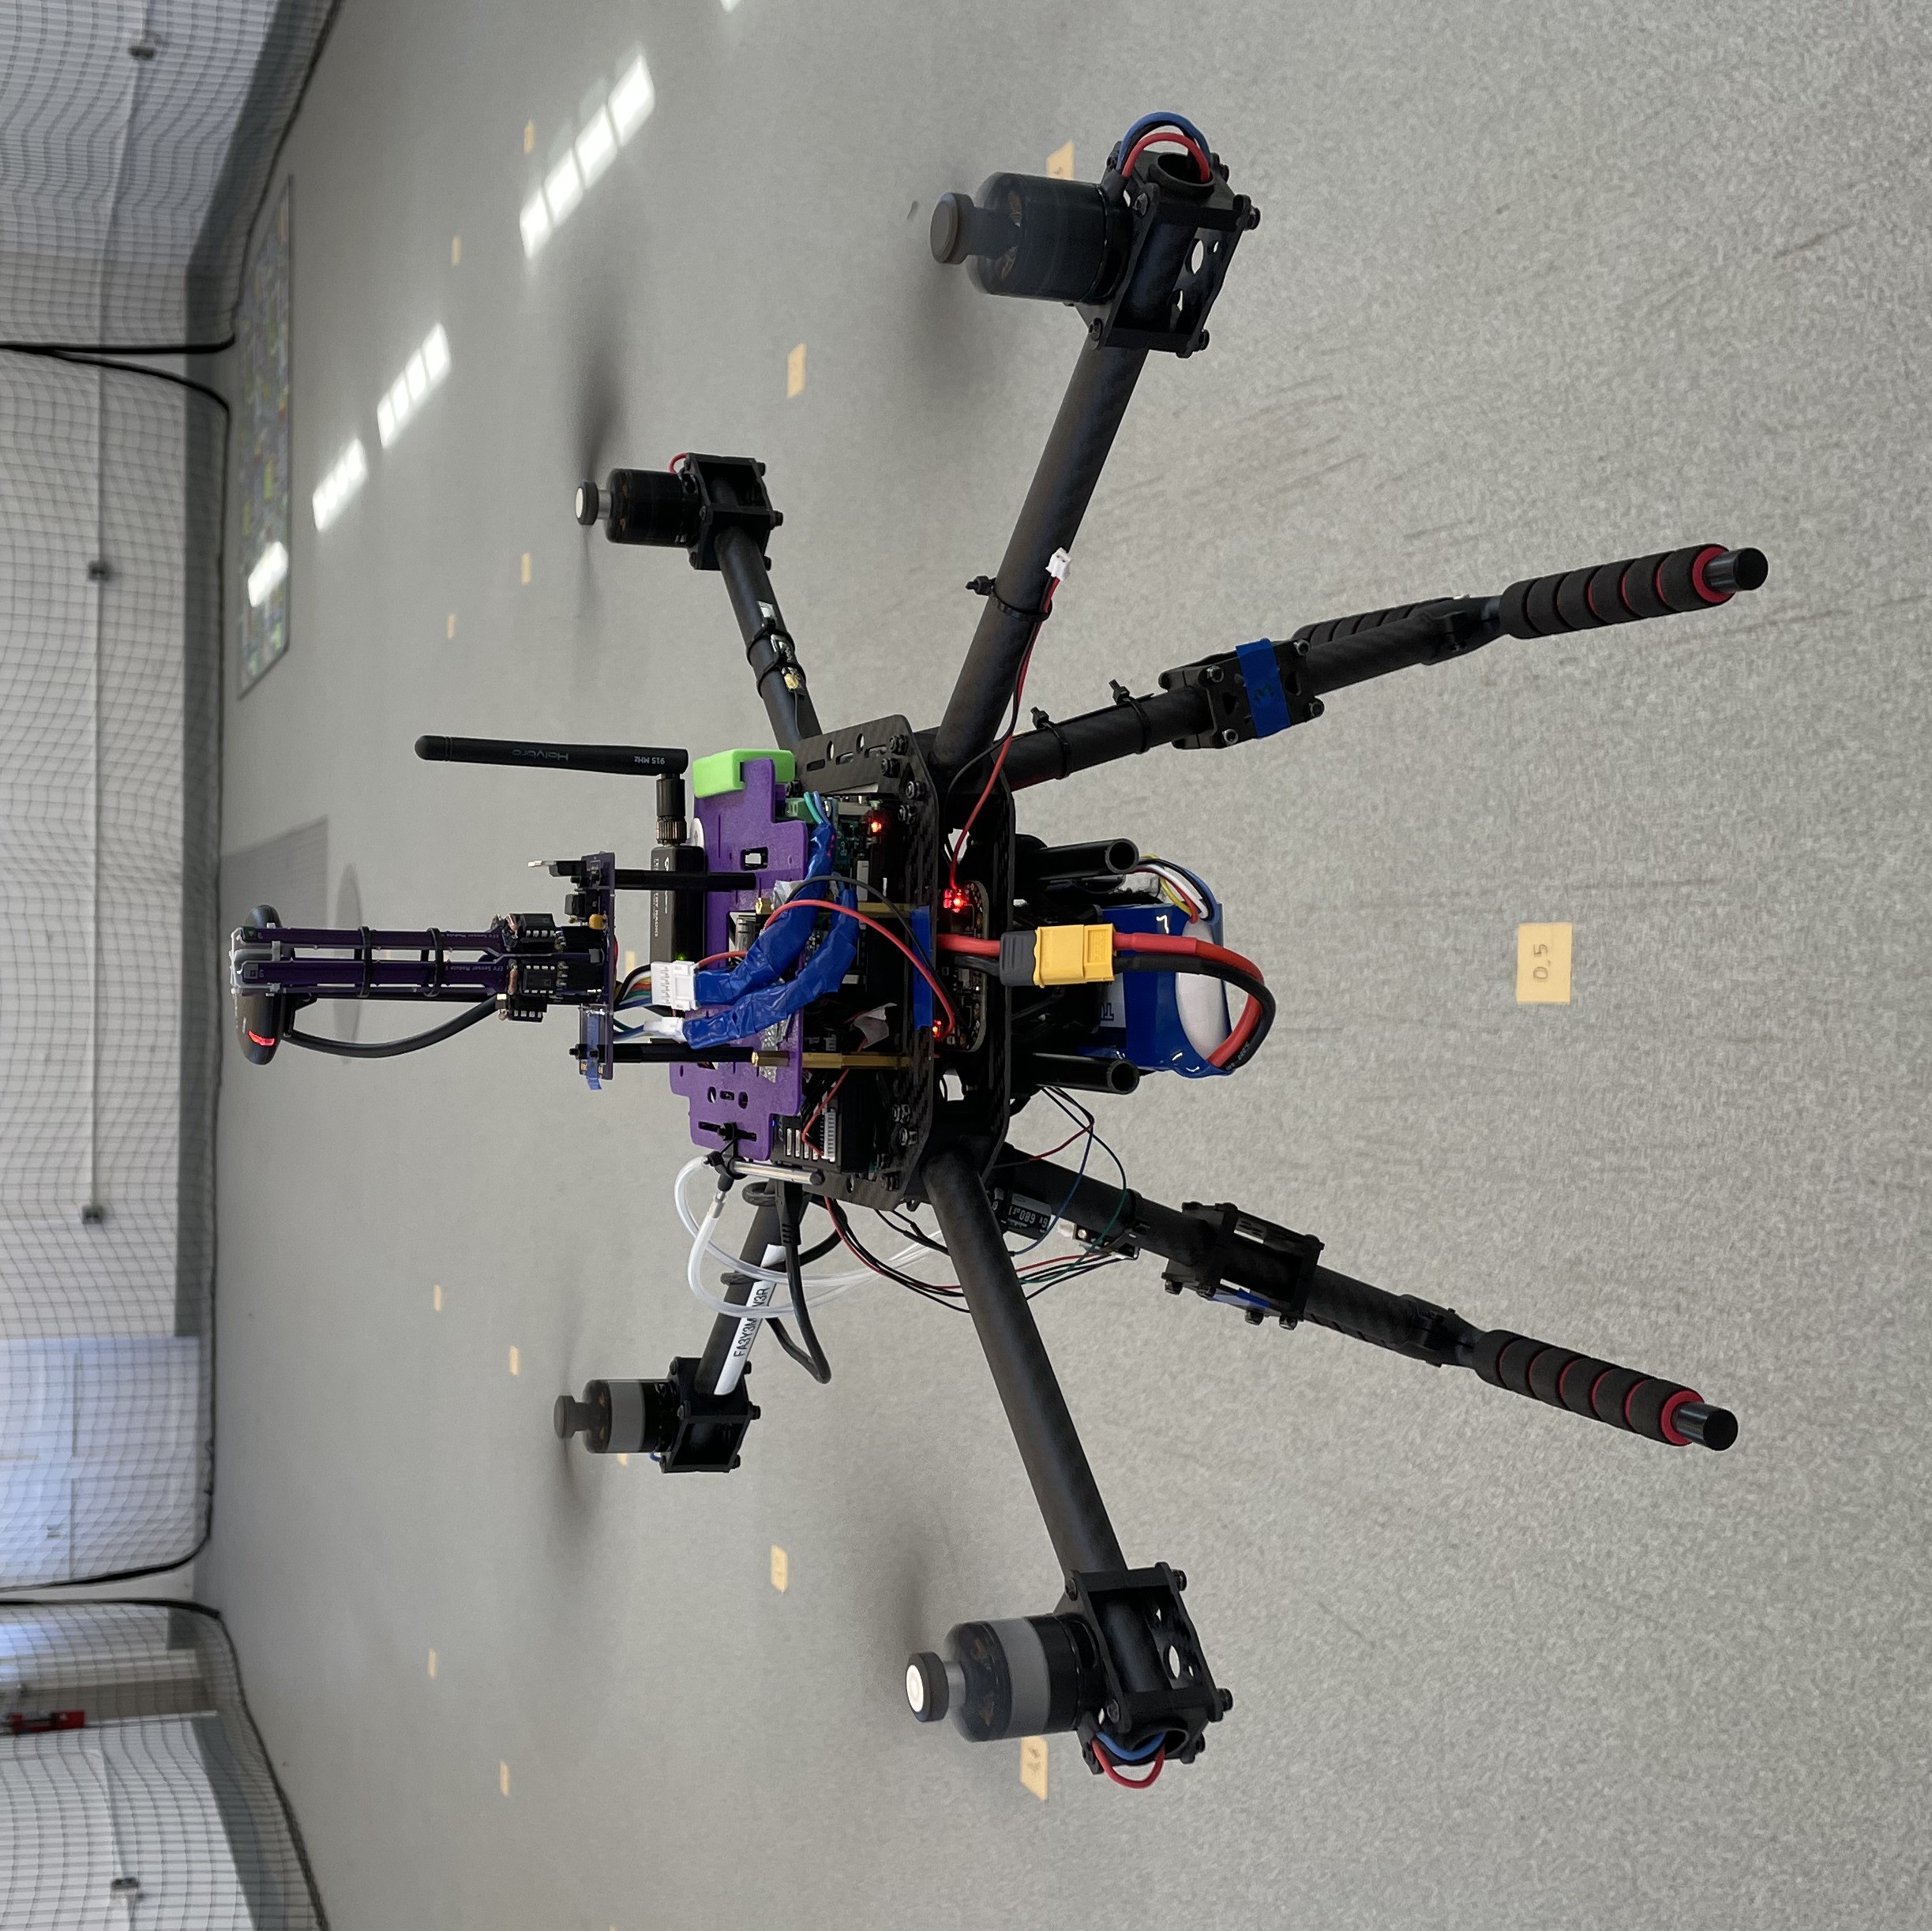
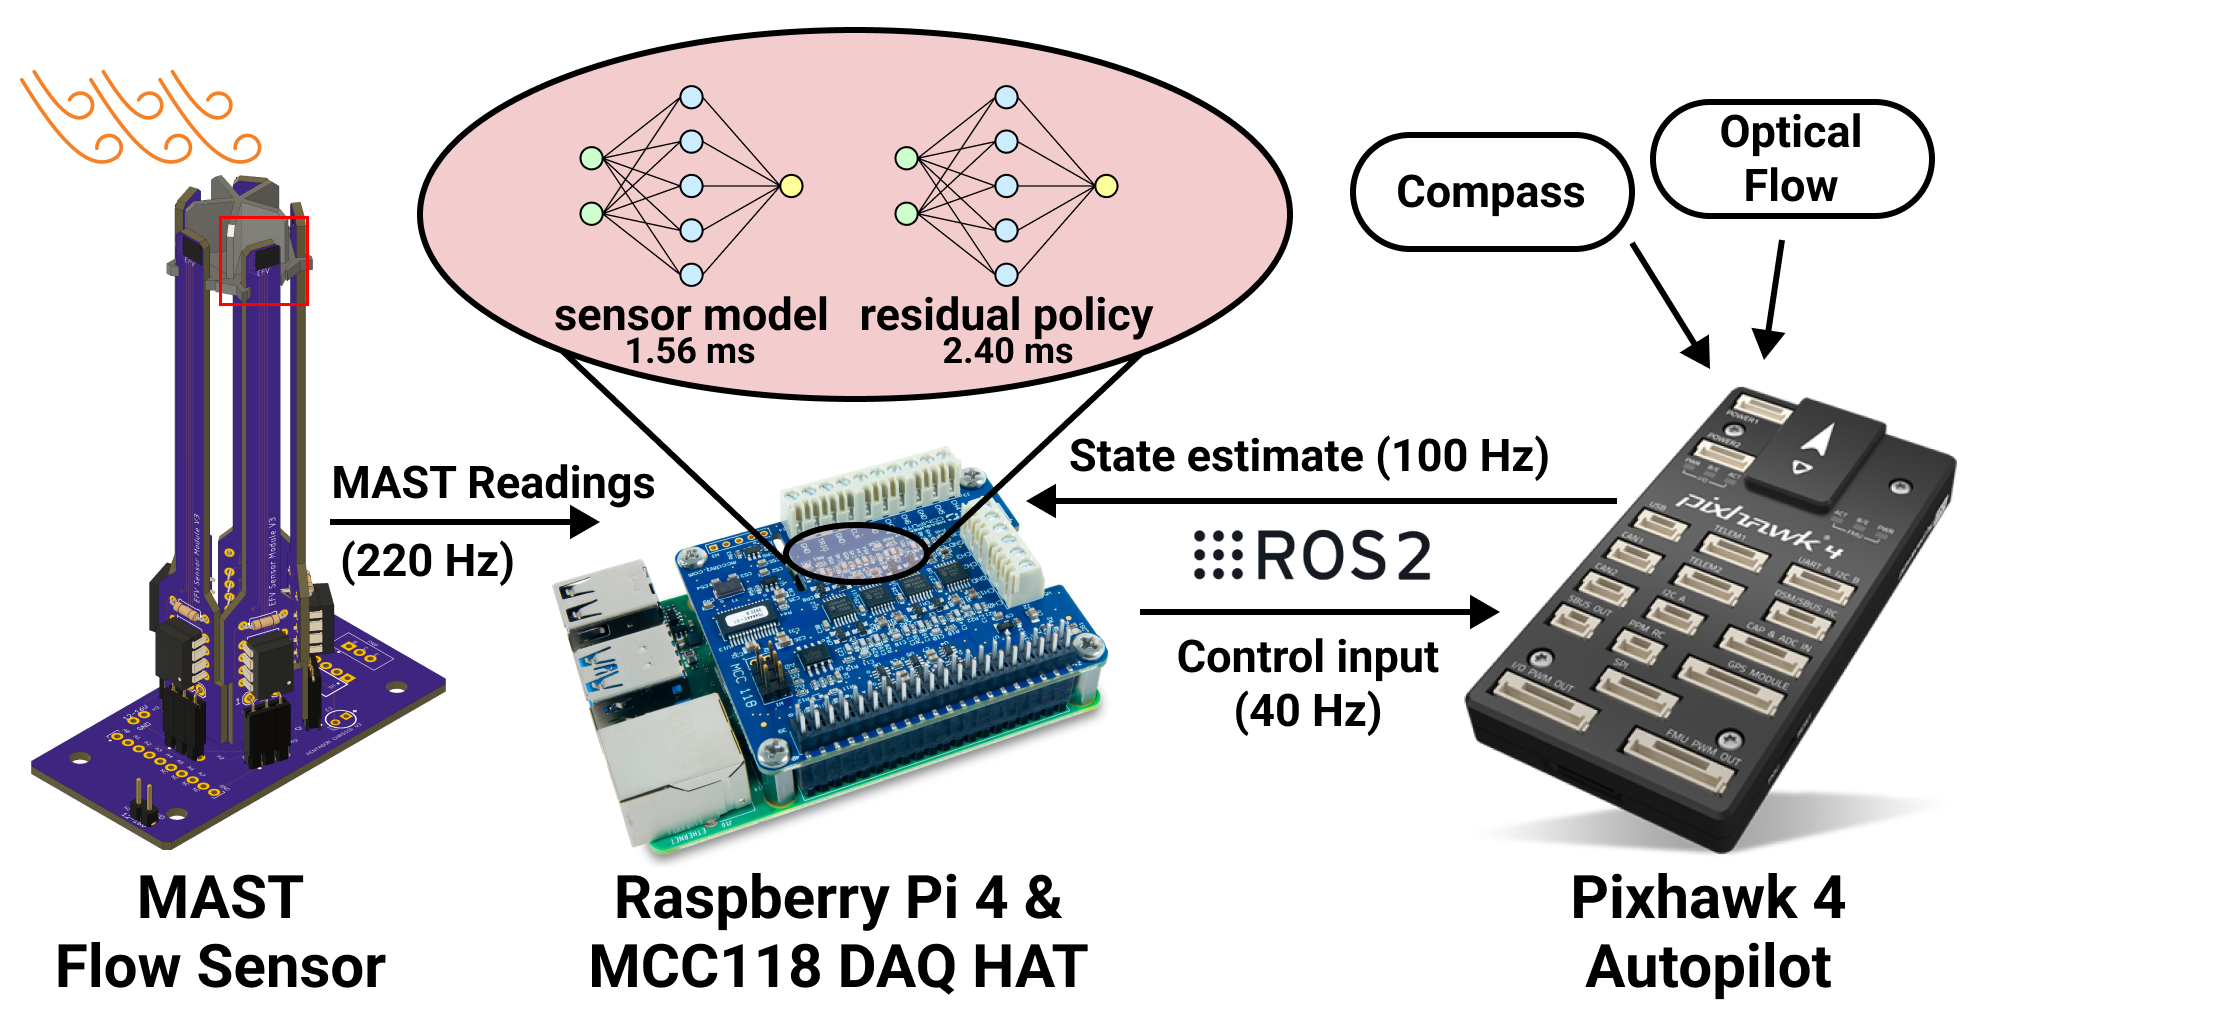
This guide walks through the design of FlowDrone, an autonomous quadrotor platform used in my research. This guide enables something very specific: autonomous, onboard, indoor/outdoor control of a PX4 platform. In other words, all computation and sensing is contained onboard (the system does not rely on motion capture or GPS for localization). Furthermore, the custom control scripts can be written in Python or C++, and commands to the PX4 are sent over the PX4-ROS 2 Bridge. Under this architecture, it is possible to read-in (and publish) any of the uORB topics, as well as to publish position, velocity, acceleration, attitude, or body rate setpoints using offboard control. While the FlowDrone platform is specifically designed for gust rejection research (via novel flow sensing), the hardware itself can be used for many other applications. Furthermore, the software could be used for offboard control of any autonomous quadrotor using the Pixhawk 4.
There is a great deal of open-source content by PX4 (tutorials, pages, forum Q&A). This guide is meant to augment that content by providing a clear, descriptive build guide for one specific platform. Details specific to the FlowDrone’s gust rejection capability will be outlined in later sections: Mast & DAQ and Results.


If you find this guide to be helpful in your research, please cite our paper, which appeared at ICRA 2023.
@inproceedings{simon2023flowdrone,
  title={FlowDrone: wind estimation and gust rejection on UAVs using fast-response hot-wire flow sensors},
  author={Simon, Nathaniel and Ren, Allen Z and Piqu{\'e}, Alexander and Snyder, David and Barretto, Daphne and Hultmark, Marcus and Majumdar, Anirudha},
  booktitle={2023 IEEE International Conference on Robotics and Automation (ICRA)},
  pages={5393--5399},
  year={2023},
  organization={IEEE}
}
Table of Contents
Hardware
The FlowDrone is based on the Holybro X500 kit, which includes the following components:
- Pixhawk 4 autopilot
- Pixhawk 4 GPS
- Power Management - PM07
- Holybro Motors - 2216 KV880 x4
- Holybro BLHeli S ESC 20A x4
- Propellers - 1045 x4
- Battery Strap
- Power and Radio Cables
- Wheelbase - 500 mm
- 433 MHz Telemetry Radio/915 MHz Telemetry Radio
Not included is the receiver, transmitter, and battery. We used an FrSky X8R, FrSky Taranis X9D Plus, and Turnigy 5200mAh 4S Lipo Pack w/XT60.
To interface with the Pixhawk 4 autopilot, we purchased an 8GB Raspberry Pi 4 companion computer. In addition to the PM07 Power Module, we installed a Matek X Class 12S Power Distribution Board to provide a 5V supply to the Raspberry Pi.
Finally, for GPS-denied state estimation (e.g. indoors), we installed a LIDAR-Lite v3 range sensor and PX4Flow optical flow sensor. The total cost of the aforementioned hardware was approximately $1,500. Building the X500 kit takes about a day. I highly recommend Alex Fache’s Pixhawk 4 + S500 Drone Build Tutorial.
TIPS: PX4Flow Setup and Installation
Follow the instructions from the px4.io website. To focus the lens:
- Plug in the PX4Flow by itself while QGroundControl is open. Navigate to the firmware tab and update the firmware by following the instructions.
- In Vehicle Setup, you should see 'PX4Flow' appear. Clicking on that, you can see the black and white camera output for focusing.
- To focus the lens, loosen the outer ring (around the lens) which will allow you to screw - unscrew the lens itself, changing the focal distance and focusing the text in the camera view.
- In Analyze Tools -> MavLink Inspector -> OPTICAL_FLOW, you can see the range reading from the PX4Flow in ground_distance.
Pluggin the Pixhawk 4 back in, you will have to toggle the SENS_EN_PX4FLOW parameter value from 0->1. There are multiple ways to do this:
- Use QGroundControl -> Vehicle Setup -> Parameters ->
SENS_EN_PX4FLOW - QGroundControl -> Analyze Tools -> MAVLink console:
param set SENS_EN_PX4FLOW 1
Once you have the PX4Flow sensor connected to the Pixhawk 4 via I2C1 -> I2CA, you can access the PX4Flow via QGroundControl -> Analyze Tools -> MAVLink console. The following commands are useful:
-
> px4flow infofor general info -
> px4flow start -Xworks to get the PX4Flow started (on I2C bus 4 (external). In the future, this may or may not start automatically upon booting up the Pixhawk 4. - MAVLink Insector should show new topics: OPTICAL_FLOW_RAD and DISTANCE. Keep in mind that DISTANCE from the PX4Flow is quite imprecise, hence the need for the LIDAR-Lite-v3.
Finally, in order to use the PX4Flow for state estimation, you must change the EKF2_AID_MASK parameter to use Optical Flow instead of GPS. This can be done in QGroundControl -> Vehicle Setup -> Parameters -> EKF2_AID_MASK.
TIPS: LIDAR-Lite-v3 Setup and Installation
Follow the instructions from the px4.io website. Similarly to with the PX4Flow, the LIDAR-Lite-v3 status can be checked using MAVLink console with ll40ls status. With the LIDAR installed, you should see the quality of the optical flow estimates be consistently high (~255). You can check the quality either through MAVLink Inspector -> OPICAL_FLOW_RAD or listener optical_flow in MAVLink console.
ROS2 Bridge (C++ / Python)
The PX4 computer and firmware is optimized for speed. This optimization renders the firmware code challenging to modify directly. It is instead recommended that you use a companion computer for your custom control scripts, and then use a communication protocol to send (receive) data to (from) the PX4. Of the available options, we chose to use the PX4-ROS 2 Bridge, which was recommended at the time. At the time of writing, the similar but subtly different PX4-XRCE-DDS Bridge is recommended instead. For this tutorial, we will use the PX4-ROS 2 Bridge (which depends on Fast-DDS as opposed to XRCE-DDS) - but keep in mind that this may no longer be officially supported.
Installing Prerequisites on the Raspberry Pi
Follow the primary guide (PX4-ROS 2 Bridge) closely. My notes seek to augment the main tutorial. There are four main prerequisites.
Install Ubuntu 20.04
First, boot Ubuntu 20.04 onto the Raspberry Pi (youtube) using an SD card. I installed ubuntu-20.04.5-preinstalled-server-arm64+raspi.img.xz. If you would like the desktop version, you can upgrade via sudo apt-get install ubuntu-desktop. The youtube tutorial recommends modifying the netplan to enable connection to wifi upon boot. I prefer to install the default .iso and connect the Raspberry Pi to a monitor, mouse, and keyboard, and to edit the netplan from there.
Here is an example of how you could configure the netplan via sudo nano /etc/netplan/50-cloud-init.yaml : (be very careful about indentation in .yaml files!)
    network:
        ethernets:
            eth0:
                dhcp4: true
                optional: true
        wifis:
            wlan0:
                addresses:
                - 192.168.0.175/24
                gateway4: 192.168.0.1
                nameservers:
                    addresses: [192.168.0.1, 8.8.8.8]
                optional: true
                access-points:
                    "WIFI NAME":
                        password: "WIFI PASSWORD"
        version: 2
Once you have the netplan configured, you can apply the changes with sudo netplan apply 50-cloud-init.yaml. After a minute or so, you can check the status of the network with ping google.com. If you are able to ping, your pi is connected to wifi! Install Fast-DDS
Follow the main tutorial: Fast DDS Installation. Here is the exact order in which I installed Fast-DDS and FastRTPSGen on a fresh Ubuntu 20.04 install:
sudo apt install openjdk-11-jre-headless
sudo apt install curl
sudo apt install zip
curl -s "https://get.sdkman.io" | bash
source "/home/ubuntu/.sdkman/bin/sdkman-init.sh"
sdk install gradle 6.3
sudo apt install cmake
sudo apt-get install build-essential

git clone https://github.com/eProsima/foonathan_memory_vendor.git
cd foonathan_memory_vendor
mkdir build && cd build
cmake ..
sudo cmake --build . --target install

sudo apt install libssl-dev
git clone --recursive https://github.com/eProsima/Fast-DDS.git -b v2.0.2 ~/FastDDS-2.0.2
cd ~/FastDDS-2.0.2
mkdir build && cd build
cmake -DTHIRDPARTY=ON -DSECURITY=ON ..
make -j$(nproc --all)
sudo make install

git clone --recursive https://github.com/eProsima/Fast-DDS-Gen.git -b v1.0.4 ~/Fast-RTPS-Gen \
    && cd ~/Fast-RTPS-Gen \
    && ./gradlew assemble \
    && sudo ./gradlew install
You can check your installation with which fastrtpsgen.
Install ROS2 Foxy
Follow the Ubuntu (Debian) installation instructions for ROS2 Foxy. I opted for the ROS-Base Install (Bare Bones) as opposed to the Desktop install. After installing and sourcing your installation, you should be able to run ros2 without error. Make sure you install the additional dependencies in the PX4 tutorial.
Install and build the ROS 2 Workspace (px4_ros_com and px4_msgs)
The px4_ros_com and px4_msgs messaging libraries provide the infrastructure to communicate with the Pixhawk 4 over ROS2. The official repositories do not (at the time of writing) support publisher/subscriber nodes written in Python, which we found very helpful in our development. If you wish to have this Python capability, I recommend installing our forks (and specifically, using the correct branch of our px4-ros-com fork). As a warning, our forks may not be maintained.
    mkdir -p ~/px4_ros_com_ros2/src
    git clone https://github.com/irom-lab/px4_ros_com.git ~/px4_ros_com_ros2/src/px4_ros_com
    git clone https://github.com/irom-lab/px4_msgs.git ~/px4_ros_com_ros2/src/px4_msgs
    git fetch origin other-python
    git checkout other-python
    cd ~/px4_ros_com_ros2/src/px4_ros_com/scripts
    ./build_ros2_workspace.bash
The build process can take >30 min on the Raspberry Pi 4. Oftentimes, it has an stderr output. However, running ./build_ros2_workspace.bash again often corrects this error (in around 1 min). Configuring the ROS2 Bridge Topics
One of the advantages of the ROS2 bridge is your ability to communicate across any of the UORB topics. From a Pixhawk 4 shell, you can list all of these topics with uorb top -1. They are also listed in the uORB Message Reference. To enable the bridge, there must be agreement between what the Pixhawk 4 publishes and what the Raspberry Pi 4 subscribes to (and vice versa).
Making your first connection over the ROS2 Bridge
Plug your Pixhawk 4 into the Raspberry Pi via USB/microUSB. The mavlink shell is a convenient way to access the Pixhawk 4 shell from the Raspberry Pi to start the micrortps_client.
First, download the mavlink_shell.py script onto the Raspberry Pi 4. You will have to install pymavlink (pip3 install --user pymavlink) before successfully executing the shell.
You can then run the shell and start the client
python3 mavlink_shell.py
>nsh micrortps_client start -t UART
Back on the Raspberry Pi, start the micrortps_agent to complete the bridge. Remember to source the px4-ros-com workspace in every terminal before using the agent or ros2 commands.
source ~/px4_ros_com_ros2/install/setup.bash
micrortps_agent -start t UART
You should see a list of the subscribed and published topics that you can send/receive to/from the Pixhawk 4. In a new terminal, you can access some of these topics:
source ~/px4_ros_com_ros2/install/setup.bash
ros2 topic list
ros2 topic echo /fmu/vehicle_attitude/out